What is DHCP?
Before we actually get into what the “DHCP failed, APIPA is being used” message means and what steps you need to take to fix it, let us first explain what DHCP is.
DHCP is short for Dynamic Host Configuration Protocol, and it’s a network management protocol in which different devices connected to the network are automatically assigned with different IP Addresses and other related configuration information.
It’s a feature that most modern routers and modems have, and it allows you to have much better network traffic management, stability, and overall, better performance throughout.
You might be wondering what happens if the DHCP option on your router isn’t working for some reason. If that’s the case, you will probably run into a few issues with your connection.
You might notice that some of your devices aren’t able to connect to your network. To get them to connect to your network, you will have to configure a static IP address on the device, and you would have to do that manually for every device you want to connect.
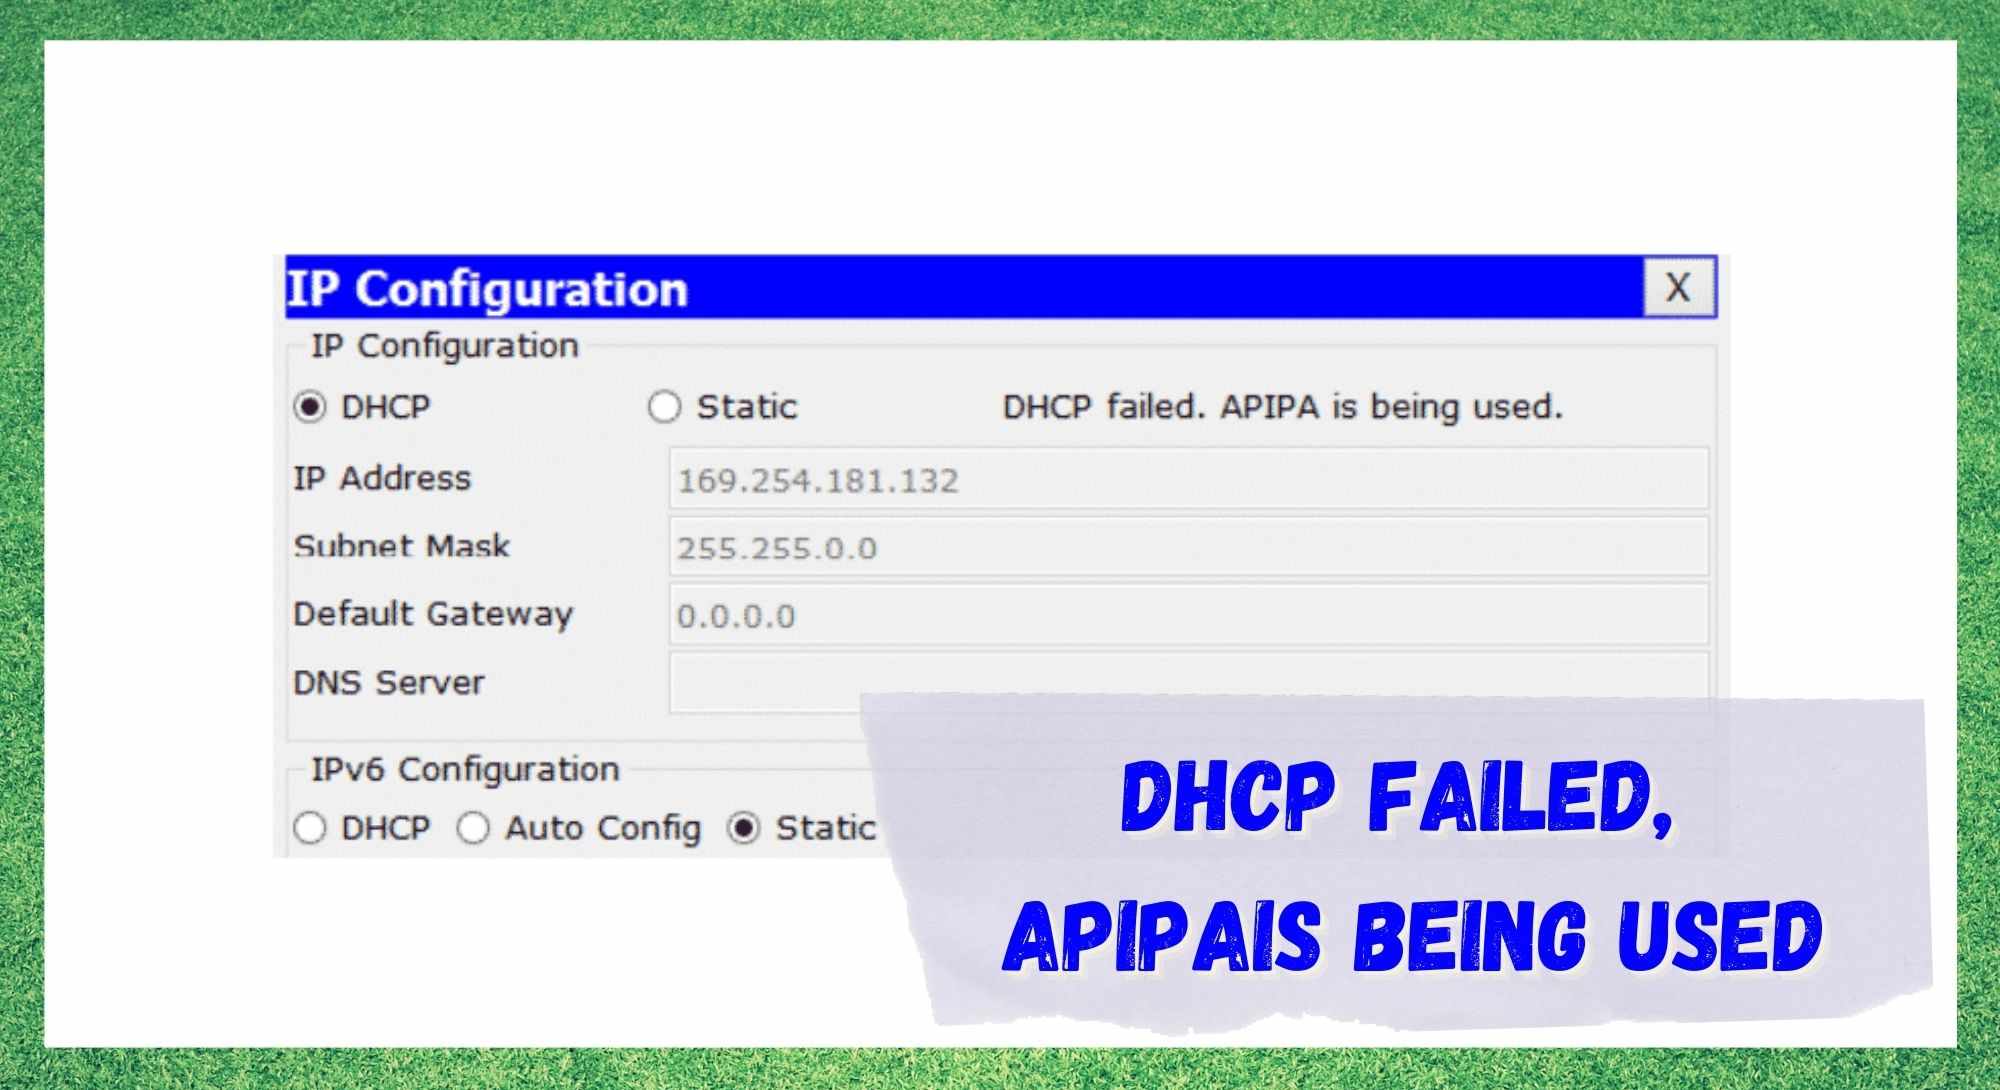
DHCP Failed, APIPA Is Being Used
If you’re having issues with the DHCP on your router, you will probably get a “DHCP failed, APIPA is being used” message on your computer, signaling that it switched to the APIPA feature. This will usually be accompanied by some network connectivity issues.
APIPA is an abbreviation for Automatic Private IP Addressing. It’s a feature that some operating systems have that allows your computer to automatically self-configure the IP address when the DHCP isn’t available.
So, if you’ve noticed such message on your computer, it’s because something is wrong with the DHCP option on your router. In the meantime, the APIPA feature will assist your computer in connecting to the network – but your other devices might not be able to do the same.
Luckily, we’re here to help you fix this error so that you don’t have to manually configure the IP addresses for all of your devices.
How Do I Fix It?
- Power Cycle Your Router
If you’re having issues with the DHCP feature on your router, the first thing you will want to try is to power cycle the router. You could be dealing with a variety of different bugs or errors on your router that could be causing all sorts of issues with your network, including the DHCP one.
If this is the case, by restarting the router, you will be getting rid of those bugs, and as a result, your DHCP will start working again.
It’s pretty easy to power cycle your router. All you need to do is take all of the cables out of your router, including the power cable. Once you take them out, wait for about a minute or two before you plug them back in.
This will completely restart your router, getting rid of all bugs and glitches that you might have had on it. After this, the DHCP issue should be gone, and you should be able to connect to your network again.
- Check The DHCP Status
Another thing we suggest that you do is check the status of the DHCP feature on your router. It’s not impossible that the DHCP option has gotten disabled somehow on your router without you being aware of it. So, you will need to make sure that this option is enabled.
To enable this feature, you will have to access the routers admin panel and go to advanced network settings. You should be able to find the DHCP option somewhere in those settings. When you find it check if it’s enabled, and if it’s not, click on the button to switch it on.
Once you have done that, make sure to save your settings and restart your router. After that, the changes you’ve made in the settings will be applied to your network and you will no longer have issues with your connection.
Most modern routers have their own firmware that requires regular updating. These updates are necessary for getting rid of any bugs or errors as well as for getting new features on your router and improving the overall quality of the network.
They are released by the manufacturers, and you should download them as soon as they come out.
We recommend setting the router to automatically download and install updates, so you don’t have to worry about it. But if you are having issues with the DHCP on your router, it’s possible that you missed some important update on the firmware.
To check if this is the case, you will have to access the router admin panel once again. There you can check if there are any new updates available and then install them if there are. Your DHCP issue should be solved once you’ve updated the firmware.
- Reset Your Router
Finally, if none of the methods we mentioned above have worked for you and you’re still left with the ”DHCP failed, APIPA is being used” message, then there’s nothing else to try but to reset your router.
We know that resetting the router might be a tedious job because you have to configure your router from scratch, but it might be able to solve the DHCP issue that you have.
By resetting the router, you will get rid of all the issues that are caused by the current configuration of the router and you will be able to connect to your network normally again.
thanks, it works LIKE