A network analyzer — sounds like a good idea but what is it and what does it do? Perhaps more accurately described as a Wi-Fi analyzer, this tool maximizes the efficiency and performance of computing devices, both on private and public networks. With the proliferation of personal wireless devices, it’s more important than ever to optimize the assets of one’s network for speed and performance.
Since Wi-Fi networks operating on the same channel are forced to share bandwidth, congestion can happen where WLANs proliferate. Locations where this scenario frequently occurs are in apartment buildings, college dormitories and even densely populated neighborhoods. It’s generally agreed that radio frequency (RF) interference is Wi-Fi’s biggest headache, causing retransmissions and affecting network reliability and speeds.
The point behind a Wi-Fi analyzer is to find the “best” (read “least congested”) Wi-Fi channels on a Wireless Local Access Network (WLAN) to access the web. The idea is to find a channel not used by other networks and, if possible, to keep from sharing the bandwidth with others. In doing so, the user strengthens the Wi-Fi signal on his WLAN and reduces signal interference. Fortunately there’s a number of freeware programs available that are simple and easy to use that will help you choose Wi-Fi channels for maximum speed.
There’s an App for That…
Users can find free network analyzers for (almost) all main operating systems including Android, Windows, Mac and Linux. In fact, Mac OS X has a native Wi-Fi diagnostics utility with an integrated Wi-Fi scanner to detect proximate Wi-Fi networks. Per osxdaily.com, here’s the lowdown:
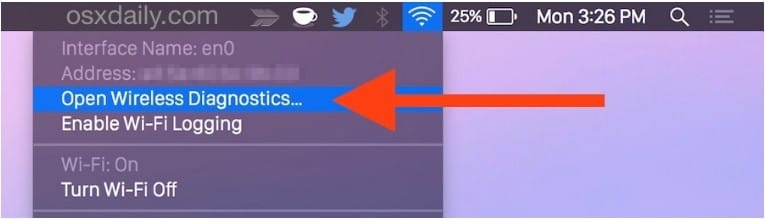
First access ‘Wireless Diagnostics’ in Mac OS X (applicable for Yosemite, Mavericks and El Capitan versions) from the Wi-Fi menu toolbar.
- Option+Click on the Wi-Fi menu item in OS X
- Choose “Open Wireless Diagnostics”
To use the scanner:
- Go to the “Window” menu and choose “Scan” to immediately open the Wi-Fi Stumbler tool built into Mac OS X
- Within the Scanner tool, click on the Scan button to scan for available networks
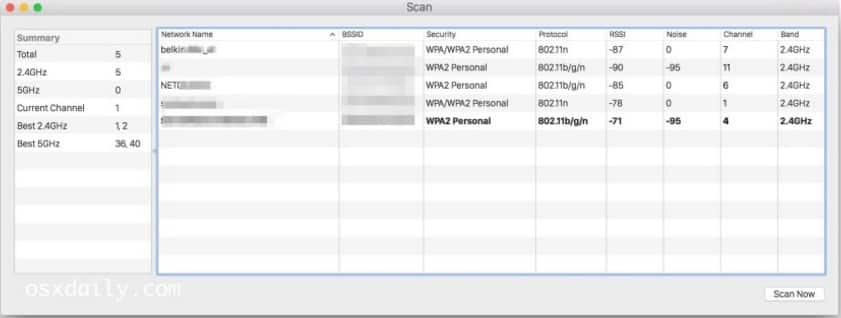
Image Credit: osxdaily.com
“This will open the wireless card to detect all possible nearby wifi networks, effectively stumbling onto available wireless routers and discovering details about those networks.”
For instructions on how to use the network analyzer on older OS X platforms such as Mountain Lion, click here.
Easy, isn’t it? And other Network Analysis tools are just as intuitive and simple to use. For example Wi-Fi Analyzer from a.farproc.com, a highly-rated app available from Google Play, “turns your Android phone into a Wi-Fi analyzer!” Some of the features offered are the ability to group networks by Service Set Identifier (SSID) and removal of access points (APs) by default that can be caused by Android. It’s free and easy to navigate but according to the most recent reviews the app doesn’t work with the latest versions of Android, i.e., v6.0.1. Reviewers have used the app to find APs in large buildings such as airports and hospitals. It’s also been used by network engineers and techs to troubleshoot broadband signals and speeds. Perhaps the biggest beef from users is that the app has become inundated with ads.
The following YouTube vid shows how to run the Wi-Fi Analyzer app:
There are a number of other free Wi-Fi analyzers availible from Google Play. Among them include:
Wi-Fi Analyzer for Android from VREM Software development
Wi-Fi Analyzer for Android from wifianalyzer.info (a paid PRO version is available)
Wi-Fi Analyzer for Android from Zoltán Pallagi (a paid PRO version is available)
Your intrepid author’s favorite, NirSoft WifiInfoView, works as advertised for his Windows 7 platform. It too is free, has a simple interface and requires no installation. Some of the network parameters displayed include
| Network Name (SSID) | Media Access Control (MAC) Address |
| PHY Type (IEEE 802.11g or n) | Received Signal Strength Indication (RSSI) |
| Signal Quality | Frequency |
| Channel Number | Maximum Speed |
| Company Name | Router Model |
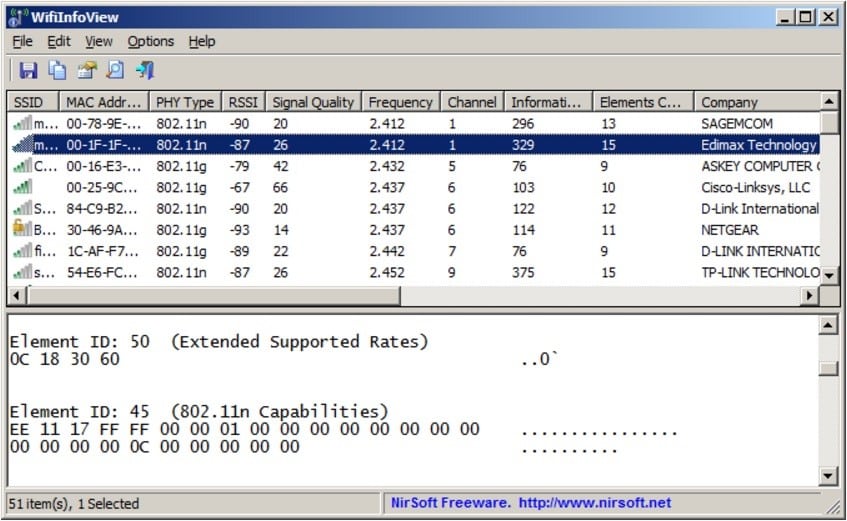
Image Credit: nirsoft.net
For Linux users, rather than install a graphical app, it’s actually easier and faster to user terminal commands. Don’t be intimidated; it’s a simple process. And most Linux users have Ubuntu distribution to complete their system kernel (Linux users know from whence I speak). Run the utility “iwlist”; the following command is installed by default:
sudo iwlist wlan0 scan | grep \(Channel
So open a terminal, run the above command and then read the output of the command, which should resemble the following:
Cell 01 – Address: 00:11:22:33:44:55
ESSID:”network-essid”
Mode:Master
Channel:11
Frequency:2.462 GHz (Channel 11)
Quality=100/100 Signal level:-47dBm Noise level=-100dBm
Encryption key:off
Note the address and the essid have been changed to protect privacy. For more details on how to run Linux utilities through a wireless card or the card’s driver, click here.
Jailbreak!
Astute readers will have noticed that a network analyzer app has not been proffered for iOS — that is, iPhones, iPods and iPads — for the simple reason that Apple locks these devices from using 3rd party apps. Users can’t tweak the iOS platform like others can on Windows, Mac or Linux systems. So “jailbreaking” is hip tech slang for being able to install non-Apple store apps on an iOS. As could be expected, Apple disapproves of jailbreaking and so they make it difficult for outside programmers to gain access to file systems for iOS devices. Be forewarned: jailbreaking an iPad is a felony while jailbreaking an iPhone is apparently legal. Go figure.
That being said, there are ways to jailbreak an iOS device. The packaging manager mobile app Cydia (a sly reference to the codling moth whose larvae is the “worm” found in apples) offers a number of (mostly free) software packages for jailbroken devices. Here would be your best bet to find a network analysis app for your iOS device if you were of a mind to break the law. Of course, even your intrepid author observes boundaries and would never encourage illegal activity. Thus the information provided here is for educational purposes only.
Coda
One of the main reasons to consider changing Wi-Fi channels in your router is that apparently most manufacturers default to channel 6. If so, then it’s understandable why routers in close proximity to each other experience interference and multiple retransmissions.
Now that you’ve identified the optimal channels for your WLAN, you’ll be relieved to know that switching channels is a straightforward procedure. For example, in Windows 7 go to Control Panel > Network and Internet > Network and Sharing Center, Click ‘Wireless Network Connection,’ then ‘Details.” Find the ‘IPv4 Default Gateway’ value, then copy and paste the IP address to the web browser address bar. Log in to the router and switch to the channels that will best support your WLAN. You’re welcome.